

How to deploy a Nodejs application to a server from scratch with an HTTPS URL?


Today we are going to see how to deploy a Nodejs application to a Linode Nanode 1GB instance with an SSL certificate using a caddy server to one of my sub-domain https://twitter.server.ksridhar.xyz
Prerequisites:
Before we dive into the code, below are some things you should know:
- You are familiar with JavaScript, Node.js in general
- You are familiar with Git and GitHub
- You are familiar with Linux systems and commands
- You are familiar with Linode
First let's see how to create an instance on Linode:
Create a free Linode account using this link you will get 60 days $100 credit and log in to Linode and click on create Linode button.
Create a Linode instance from this page where you need to choose the operating system(choose the one you are most comfortable with I am choosing ubuntu), server location(choose the nearest location to your place), now select a plan I am choosing the shared CPU section and selecting the Nanode 1 GB instance for my project.

- Add a password to your instance and add the ssh key if you want to use ssh to your server, then click on create Linode button it will create an instance for you in a few minutes and It will assign you an IP address for you to use.
Let's see how to deploy your application to your server:
- First ssh into your server using this command from your Unix terminal.
ssh username@ipaddresss
Once you ssh into your it is a new system for you to use, so we have to update our system drivers and install certain dependencies such as git, Nodejs, neovim and net-tools.
Update your system using this command
sudo apt-get update && sudo apt-get upgrade
- Install git, neovim(to edit files in the server) & net-tools(net-tools are used to see what ports are running in your server).
sudo apt install git net-tools neovim
- Install Nodejs, I am using volta to install nodejs you can use other ways as well.
# install Volta
curl https://get.volta.sh | bash

# install Node
volta install node

# start using Node
node

# check  Node version
node -v

# check Npm version
npm -v
- Once you install nodejs, clone your project into the server in my case I am using this nodejs project
git clone repository link
- Now change the directory into the project and install the dependencies
cd projectName && npm i
- Start the project using your script in your project
npm start
If you visit your IP: port in the browser (example: http://156.46.42.207:8000), you can see use your project is running but this way does not work once you close your terminal from the server so you have to use pm2 which is a node process manager to run your project.
To use pm2, you have to install the pm2 globally first
volta install pm2
- Once pm2 is installed you can create a
ecosystem.config.jsfile to list your env variables and other things but I am not doing that in my project. Instead, i am directly starting the project and creating an env file, and adding my environment variables.
# create an env file
touch  .env

#Edit the file using neovim
nvim .env

#Start the pm2 process in my case the file is preset in src/server.js
pm2 start src/server.js
- Now you see the logs and see the process using the following commands.
#To list all the pm2 process
pm2 list

#To see the logs run
pm2 log processNumber

#You can also restart the server using this
pm2 restart processNumber

#You can also monitor using this command
pm2 monit 0

#To flush all process logs
pm2 flush

#To flush logs only certain process
pm2 flush processNumber
If you visit your
IPAddress: port(port is your application running port number) number you check your endpoints but know we will convert this HTTP into HTTPS with caddy and a sub-domain to my domainksridhar.xyzFirst, we will install caddy from this caddy docs install link, so I am running ubuntu on my server so I am using these commands:
sudo apt install -y debian-keyring debian-archive-keyring apt-transport-https

curl -1sLf 'https://dl.cloudsmith.io/public/caddy/stable/gpg.key' | sudo tee /etc/apt/trusted.gpg.d/caddy-stable.asc

curl -1sLf 'https://dl.cloudsmith.io/public/caddy/stable/debian.deb.txt' | sudo tee /etc/apt/sources.list.d/caddy-stable.list

sudo apt update

sudo apt install caddy
- After installing Caddy we can use the following commands:
#To check the caddy status
systemctl status caddy

#To stop caddy you can use this command:
sudo systemctl stop caddy

#To start cady you use this command:
sudo systemctl start caddy
- we need to add a DNS record to your domain provider, I am using Cloudflare as domain manager so I am adding
Arecord to my sub-domaintwitter.serverwith the content field as my server IP Adress
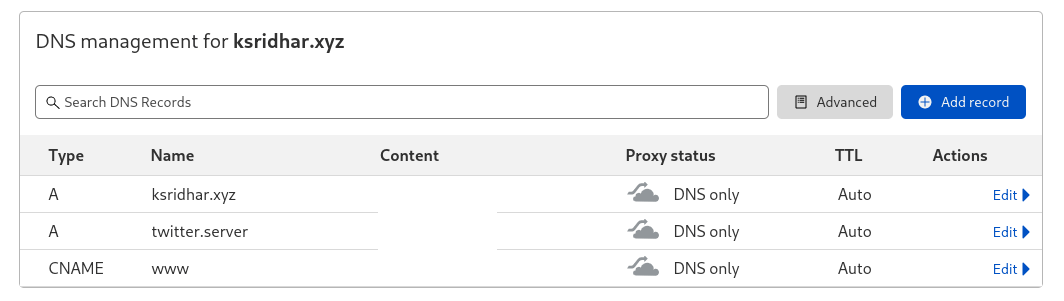
Tip: If you are using Cloudflare free account then turn off the proxy status for your record which will cause some issue for your domain, you can also check your website SSL certificates from your terminal using the following command
#Here I am using my domain but you can use any web address to check their SSL certificates
curl https://ksridhar.xyz -v
- Once you added a sub-domain you need to add this line into your caddy file which can be opened and changed by the following commands:
#To open caddy in you system
nvim /etc/caddy/Caddyfile

#Add this sub-domain with the following object

twitter.ksridhar.xyz {
    reverse_proxy localhost:PORT
}
- PORT is your application running port number
Tip: similarly, you can add any number of domains and sub-domains into the
Caddyfilein your server with respective ports, once you reload caddy it will create all the HTTPS URLs.
- All you need to do know is to reload the caddy using this command:
sudo systemctl reload caddy
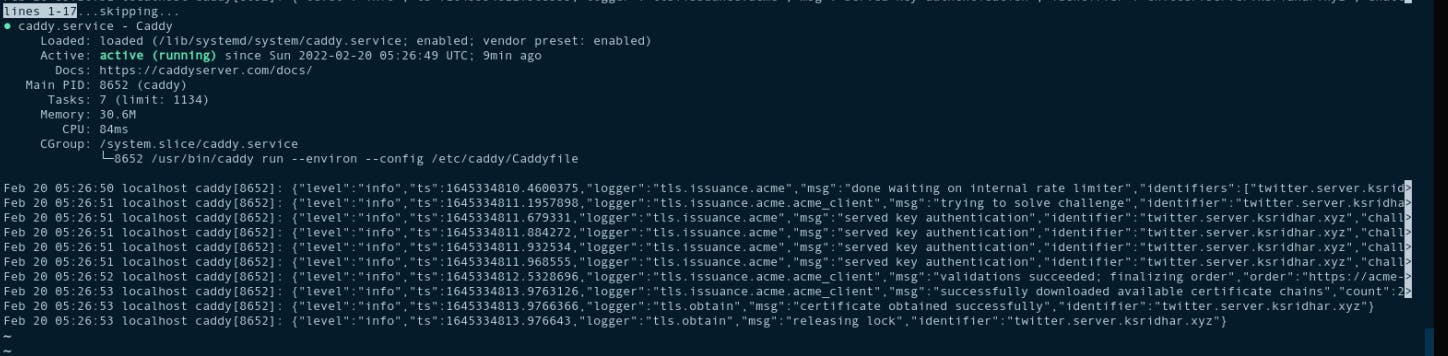
- Know check for any errors in the caddy server with the status command, if there are no errors then your application is converted to HTTPS with the sub-domain, this is how the status logs show if it is successful.
Thank you for reading, and let's connect!
Thank you for reading my blog. Feel free to subscribe to my blog and connect on LinkedIn or Twitter.